Brief Description #
The Enquiry module of the CatalogX plugin enables a streamlined process for users to submit enquiries about products. Once this module is activated, the admin can configure various settings related to the enquiry button, enquiry form, and more. With this module, businesses can enhance customer engagement by providing a simple and efficient way for users to request more information about their products.
Requirements #
- WooCommerce
- CatalogX
- CatalogX Pro (For advanced features)
Configuration of the Enquiry module #
Let’s begin by enabling the module:
- Go to the admin dashboard.
- Click on the “CatalogX” option in the navigation menu.
- Once the submenu list appears, click on the “Module” option.
- Enable the “Enquiry & Communication” module accordingly.

Now, let’s take a look at the settings related to this module:
Shopping Journey #
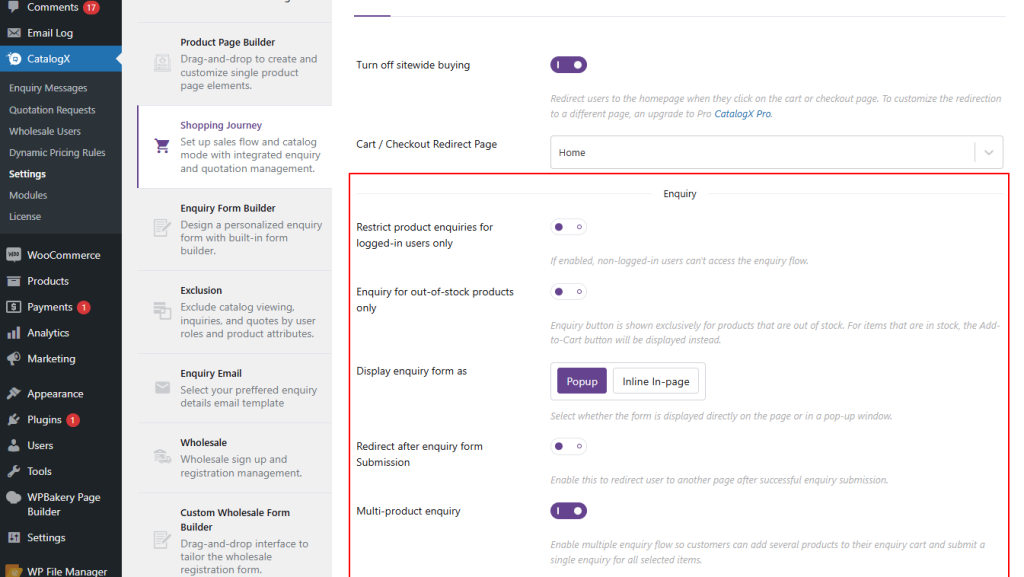
- Restrict product enquiries for logged-in users only – Once this setting is enabled, non-logged-in users will not be able to access the flow associated with the “Enquiry & Communication” module.
- Enquiry for out-of-stock products only – If the admin enables this setting the enquiry form will come for the products having stock status set as “out-of-stock”.
- Display enquiry form as – Here you can select how you want your enquiry form to appear on the single product page. The form will either open as pop-up or it will come inline with the enquiry button.
- Redirect after enquiry form Submission – Enable this to redirect users to another page after successful enquiry submission.
- Post inquiry submission redirect page – Select the page where you want your users to get redirected after submitting the enquiry form.
- Multi-product enquiry – Once this is enabled the users get the option to add multiple products to the enquiry cart together and then submit a single enquiry form for all the products present in the enquiry cart.
- Attachment – Here in this section the admin can select whether they want to download the enquiry form as a PDF file or they want to attach it with the email.
Product page builder #
This setting allows administrators to customize the “Enquiry” button to their preferences. Customization options include:
- Button text
- Button background color
- Font color
- Button background color on hover
- Font color on hover
Additionally, administrators can:
- Modify the button’s border details
- Adjust padding and margin as needed
- Add a custom link for the button
If a link is provided, clicking the button will redirect users to the specified page. To maintain the button’s default functionality, simply leave the “page link” section blank.
These options provide flexibility in designing the button to match your site’s aesthetic and functional requirements.
Enquiry form builder #
Here the admin gets the option to enable different fields which they want to be there in the enquiry form that the user needs to fill for their enquiry. The below are the field options that the admin can enable for the enquiry.
- Name: When enabled, a field will appear on the enquiry form for users to fill in their name.
- Email: Enabling this option adds a field for users to enter their email address.
- Phone: This option adds a field for users to input their phone number.
- Address: When enabled, a field for address details will appear on the form.
- Enquiry About: Enabling this option adds a section for users to specify the subject of their enquiry.
- Enquiry Details: This option creates a field for users to provide detailed information about their enquiry.
- File Upload: When enabled, users will have the option to upload files in the enquiry form.
- File Upload Size Limit (in MB): The admin can specify the maximum file upload size for users here.
- Captcha: Enabling this option adds a captcha field to the enquiry form.

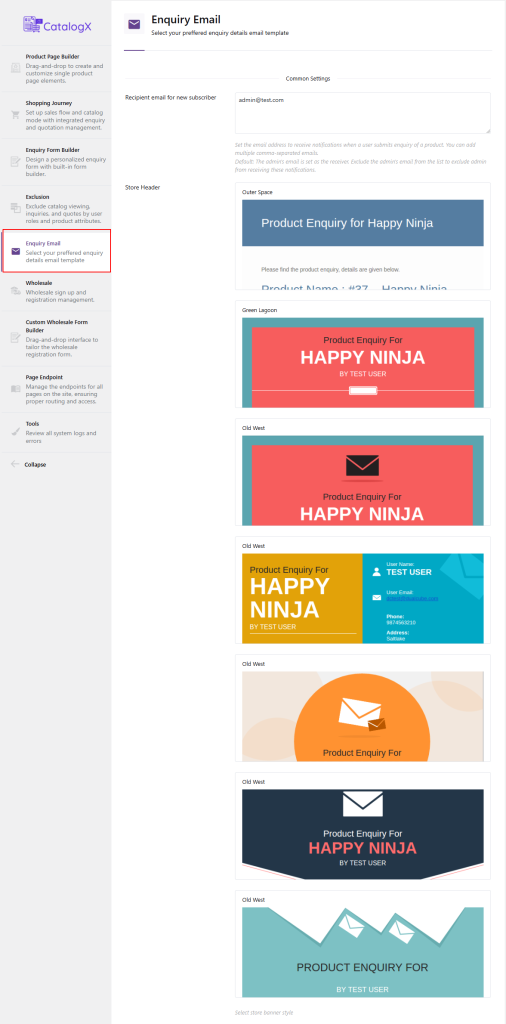
Enquiry email template #
- Common Settings: In the common settings section, the admin can add email address to receive notifications when a user submits enquiry of a product.
- Custom Email Subject: Here, the admin can select the enquiry email template from the predefined templates.
Tools #
Additional CSS – Here in this section you can add your custom CSS to customize the enquiry form as per your requirement.

Enquiry form fields for the the Catalog X Pro #
Here you can add the form title and add different fields types to appear on the enquiry form –
- Textbox – With this option you can let your user enter a small text for the form field.
- Email – Ask the user to add the email address through this format.
- Textarea – Use the textarea to ask users to add a description about a particular product or essential features of their store.
- Checkboxes – You can give users options to select from by using the checkbox format.
- Multi-Select – Unlike a checkbox format, the multi-select option lets your users choose multiple options.
- Radio Buttons – Radio buttons provide options for users to select their desired response.
- Drop-Down – The drop-down option permits your users to pick the preferred option. You can upload your alternatives within the label area and use the add new choice button to maintain adding new choices.
- reCAPTCHA – The reCAPTCHA format option is a good way of keeping your site safe. Its advanced risk analysis engine helps keep malicious software from engaging in abusive activities on your website. You can also register for a reCAPTCHA on google by selecting this link. Given below are the two reCaptcha types –
reCAPTCHA v2 – The reCAPTCHA v2 requires the user to click the “I’m not a robot” checkbox and can serve the user an image recognition challenge.
Recaptcha Script – You can safely add your reCAPTCHA v2 to your marketplace by following this documentation.
reCAPTCHA v3 – Unlike the reCAPTCHA v2 option, the reCAPTCHA v3 runs in the background and generates a score based on a user’s behavior. The higher the score, the more likely a user is human. Here you need to add a site key and secret key. To get your Site Key and Secret Key follow these steps –
Go to the reCaptcha page. Once there, select the Admin Console option.
Enter a label for your ReCaptcha and select the V3 checkbox.
Add the URL for your site in the Domain section.
Accept the terms of service and click Submit. Copy the Site Key and Secret Key that Google generates and paste them here.
- Attachment – The attachment format is helpful when you want your users to upload files.
- Section – The section format divides the enquiry form into sections.
- Date picker – The admin can select this option to let user pick a date in the form
- Time picker –Adding this section will give users the option to pick a time.
Note – While adding the form fields the admin can also limit the character limit for the input of a field. They can choose the visibility of the added fields and also mark the fields as “Required”.
Enquiry message Hub(CatalogX Pro) #
Now let us look at the configuration of the enquiry message submenu. In this section the admin can see all the customer queries and reply to those from this submenu and also get option to search queries by different attributes mentioned below –
- Enquiry status – Here admin can select enquiry status(read, unread, all, closed).
- Product name – By selecting product name the admin can have a look at the queries for a particular product
- Customer name – By selecting the customer name the admin can see queries from a particular customer.
- Enquiry number – Select enquiry number for a particular enquiry.
- Selecting date range – The admin can search for queries by setting up a date range to see the queries within that range.


