
Brief Description #
The Enquiry & Communication module of the CatalogX plugin enables a streamlined process for users to submit enquiries about products. Once this module is activated, the admin can configure various settings related to the enquiry button, enquiry form, and more. With this module, businesses can enhance customer engagement by providing a simple and efficient way for users to request more information about their products.
Requirements #
- WooCommerce
- CatalogX
- CatalogX Pro (For advanced features)
Configuration of the Enquiry module #
Let’s begin by enabling the module:
- Go to the admin dashboard.
- Click on the “CatalogX” option in the navigation menu.
- Once the submenu list appears, click on the “Module” option.
- Enable the “Enquiry & Communication” module accordingly.

Now, let’s take a look at the settings related to this module:
Customer Engagement #
To configure the Enquiry settings, navigate to CatalogX → Settings → Customer Engagement and scroll down to the Enquiry Journey section. Here, you can customize how customers interact with the enquiry feature on your store.
Who Can Submit Enquiries #
Choose who can submit enquiries through your website.
- Everyone: Allows both guests and logged-in users to submit enquiries.
- Logged-in Users Only: Restricts enquiry submissions to registered customers who are logged into their accounts.
Show Enquiry Button For #
Select the products on which the Enquiry button should be displayed.
- All Products: Displays the Enquiry button on every product.
- Out-of-Stock Products Only: Displays the Enquiry button only for products that are currently out of stock.
In-Stock Notify Me Button #
Enable this option to allow customers to subscribe for notifications when an out-of-stock product becomes available again. A Notify Me button will be displayed on eligible products, allowing customers to receive an email once the product is back in stock.
Display Enquiry Form As #
Choose how the enquiry form should appear on the single product page.
- Popup: Opens the enquiry form in a popup window when the customer clicks the Enquiry button.
- Inline: Displays the enquiry form directly on the product page below or alongside the Enquiry button.
What Happens After Enquiry Submission #
Choose the action that should take place once a customer successfully submits an enquiry.
- Stay on Current Page: Keeps the customer on the same product page after the enquiry is submitted.
- Redirect to Another Page: Redirects the customer to a page of your choice, such as a Thank You page or a custom confirmation page.
If you select Redirect to Another Page, an additional setting named Post Enquiry Submission Redirect Page will appear, allowing you to choose the page where customers will be redirected after submitting their enquiry.
Attachment #
Choose how enquiry details should be shared.
- Download as PDF: Allows the submitted enquiry to be downloaded as a PDF document.
- Attach with Email: Includes the enquiry details as a PDF attachment in the email sent to the customer or administrator

Form builder #
To customize your enquiry form, navigate to the Enquiry Form Builder section. From here, you can enable or disable individual form fields based on the information you want to collect from your customers.
- Name – Enable this option to display a Name field on the enquiry form, allowing customers to enter their full name.
- Email – Enable this option to add an Email Address field, allowing customers to provide their email for future communication.
- Phone – Enable this option to include a Phone Number field on the enquiry form.
- Address- Enable this option to display an Address field, allowing customers to enter their address details.
- Subject – Enable this option to add a Subject field where customers can specify the purpose of their enquiry.
- Comment – Enable this option to display a Comment field where customers can provide detailed information about their enquiry.
- File Upload – Enable this option to allow customers to upload files, such as documents, images, or other attachments, along with their enquiry.
- File Upload Size Limit (MB) – Use this setting to define the maximum file size, in megabytes (MB), that customers can upload through the enquiry form.
- CAPTCHA – Enable this option to add a CAPTCHA field to the enquiry form, helping protect your website from spam and automated submissions.
Email Customizations #
Under this section the admin can set up Recipient email for new subscriber and the dded temail address to receive notifications when a user submits enquiry of a product. You can add multiple comma-separated emails.
Also with The CatlogX Pro the admin can set different email templated for the enquoiry form submissions,

Enquiry form fields for the the Catalog X Pro #
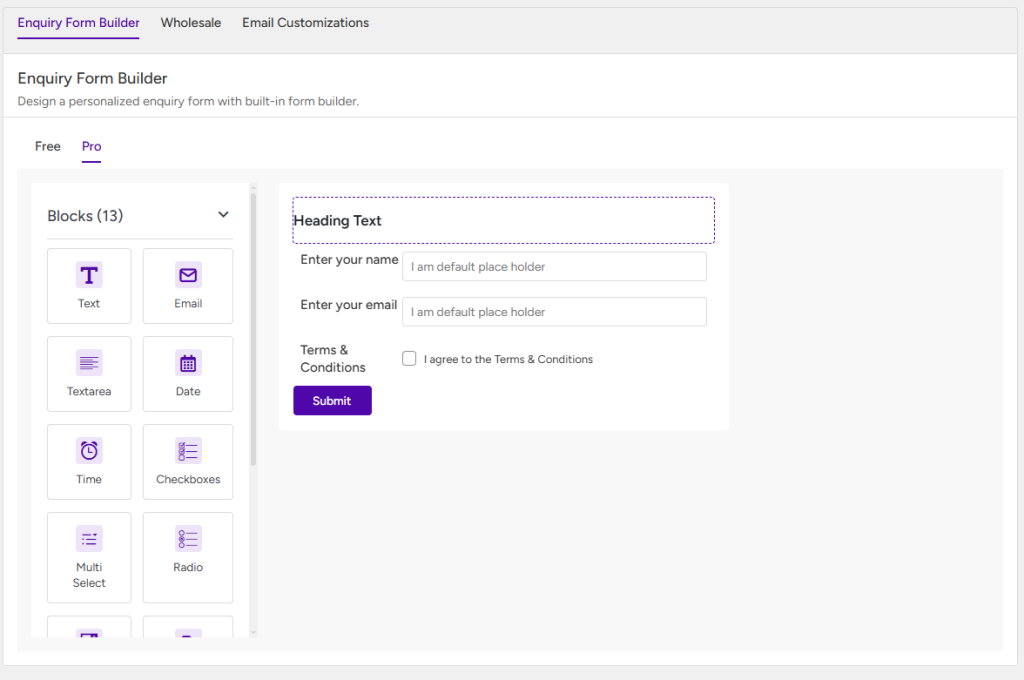
To customize the Enquiry Form, navigate to CatalogX → Settings → Form Builder → Enquiry Form Builder. From this page, you can add, edit, remove, or rearrange the registration form fields to suit your business requirements.
The Enquiry Form Builder supports the following field types:
- Text – Adds a single-line text field for short user inputs, such as a company name or designation.
- Email – Adds an email input field that validates the email address entered by the user.
- Textarea – Adds a multi-line text field for collecting longer responses or additional information.
- Checkbox – Allows users to select one or more options from a list.
- Radio Button – Allows users to select a single option from multiple predefined choices.
- Multiselect – Enables users to select multiple options from a dropdown list.
- Attachment – Allows users to upload supporting files or documents as part of the registration form.
- Section – Organizes the registration form into separate sections, making it easier for users to complete.
- Date Picker – Allows users to select a date using a calendar interface.
- Time Picker – Allows users to select a specific time using a time picker.
- Terms & Conditions – Adds a mandatory acceptance checkbox that requires users to agree to your terms and conditions before submitting the registration form.
Note: While adding form fields, you can define the maximum character limit for text-based inputs, control the visibility of each field, and mark fields as Required to ensure users provide the necessary information before submitting the form.
Enquiry message Hub #
Now let us look at the configuration of the enquiry message submenu. In this section the admin can see all the customer queries and reply to those from this submenu and also get option to search queries by different attributes mentioned below –
- Enquiry status – Here admin can select enquiry status(read, unread, all, closed).
- Product name – By selecting product name the admin can have a look at the queries for a particular product
- Customer name – By selecting the customer name the admin can see queries from a particular customer.
- Enquiry number – Select enquiry number for a particular enquiry.
- Selecting date range – The admin can search for queries by setting up a date range to see the queries within that range.


